Posts tagged ‘equipment’

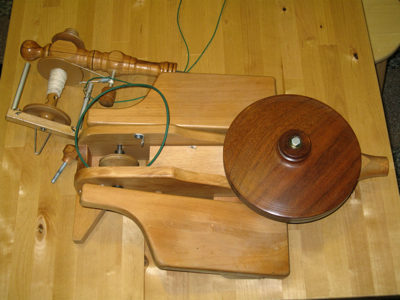
The Maker Faire stuff is coming in and this week I got the loom we will be using. It’s an Ashford Knitters Loom, a small folding rigid heddle loom.

It took about 10 minutes to get it out of the box and put together both the loom and the stand. It’s clearly a beginner’s loom, plastic parts keep both weight and cost down. But it’s nicely finished and quite serviceable for small scarves, bags, table runners and so on. It comes with a 7.5 dent reed and you can get several others.

Included with the loom is a warping peg to measure warp by looping your yarn through the reed, around the peg and then the back beam, with both loom and peg clamped to solid objects. This is a simple variant of and old technique, using a warping drum to maintain tension while winding. After you beam the warp, you pull every other end out of the slots in the reed and put them in the holes (like threading back to front.) I haven’t tried it yet, but it seems simple enough.

My first thought was that I’d replace the plastic holding rods to the beams with cords as I wonder if the cable tie like things snapped into the beam might pop out eventually. I’ve had my warp come undone during weaving and it’s a whole lot of no fun. The other thing is how much warp can you actually get on it, and for anything more than the recommended 2 yards I think I’d prefer the old-fashioned way. Of course, I’m not new to this weaving stuff and someone who is just getting started wouldn’t even know to consider it. Which is just as well.

It is nice that it comes with clamps, as there is no way you will get a good warp on any tiny loom without something holding it down while you beam under tension. The warping instructions tell you to have a friend hold the warp while you beam, although if you look online there are directions for doing it on your own (which is most likely in my opinion.) Fortunately for short warps with typical knitting yarn, tension isn’t a huge deal.

This weekend I’ll try putting on a warp and report back on how that goes.

I got a new spinning wheel yesterday, a Majacraft Little Gem from a local friend who is unloading her spinning stuff. It’s seen hard use and has some cosmetic damage but is otherwise sound. I set it up and noticed it didn’t treadle as smoothly as it ought to.

It could use some clean-up, being covered in lint, but after a general de-lousing it still needed some help. The treadle mechanism had fiber wrapped around the shaft and in general it was a bit gunky.

Important Note: Professional Driver, Closed Course. Please to do not take this as license to disassemble your spinning wheel willy-nilly. Getting those little parts back together in the correct way is not as easy as it looks.

So here is the patient on the workbench:

Little Gem spinning wheel, partly disassembled

Step One: find the metric hex key set. It is conveniently attached to my bicycle tool. You can field strip almost anything with this and open your beer when you are done.

I took off the crank arms, removed the screws holding the center pulley and cleaned the shaft as much as possible. The shaft itself didn’t want to come out so I didn’t push it. With some help from my handy-dandy bench vise (and a conveniently located husband who has better hand strength) I was able to disassemble and clean both cranks.

loosening the crank bolt took some work

I could then use the WD-40 to clean the quite filthy parts.

cranks disassembled

Put everything back together, give it a final once over with the canned air, and it runs much better.

My knitting and I made it back in one piece, although it was touch and go there for the knitting. I very nearly had a Textile Emergency in the airport on the way out of town. Apparently Ronchi airport security doesn’t like metal knitting needles. Or crochet hooks, blunt toy scissors or safety pins. They were quite helpful in trying to get them securely into a checked bag, but there was no way I was getting on the airplane with my dangerous safety pin and whatnot. This is what I get for failing to replace my remaining long 3mm circular needle with a wood one.

Fortunately for me, and I did not before this weekend think I would ever have cause to say that, a different security detail was at the same time questioning DH and giving one of our checked bags the rubber glove treatment. For a can of dolmas. It was quite confusing for a moment as while I was attempting to explain to the nice inspection signorina in half English and half Italian that my husband had a bag that could be pressed into service as checked, said husband and bag vanished into a remote hallway. But convenient since they had already pulled the checked bag for inspection, it was available to stash the offending textile implements.

If we hadn’t been staying overnight in Munich on the way back, I would have been really irritated to go without knitting across a continent and a half and a rather good-sized ocean. (It’s about 24 hours on a normal trip, without the long layover.)

I did make an attempt to find a new, non-metal needle in Munich but the giant Nordstrom-clone store’s knitting department did not carry the hugely popular and made in Germany Addi needles. I picked up a suitable Inox on the theory that at least it looked like it could be plastic but quickly found out that I can’t stand the bent cord ends they have.

And of course, the Munich airport security didn’t bat an eyelash. (They did inspect my bag of knitting stuff on the first half of the trip and had no problems.)

I picked up the Leclerc warping mill I ordered a few weeks ago, I got the tabletop model. After a disastrous experience with a paddle and the warping board I determined it was time to have a warping mill again. I sold my old one with the loom before I came to San Francisco.

Previously I had the substantially similar Harrisville model, which is kinda nice as it has an integral brake to hold it in place while chaining off. I actually liked that quite a lot. But the Leclerc was about $50 less and comes already finished. The price was the smaller issue, more is that I just don’t have time to deal with the requisite sandpaper and can of oil. I can live without the brake, there are other options that can be temporarily installed as needed.

But now I get to assemble the thing. One difference is once this gets together, it’s not coming apart. The Harrisville was easier to put together (after finishing) because everything is held with wing nuts. That means it also came completely apart. That is a small advantage in storage as you can break it down to basically a pile of rods and the base.

The Leclerc has screws to hold the frame together. There are pilot holes but it is still difficult, I don’t have the strength to do it without assistance as it takes two hands to turn the screwdriver. I’ve got it partly assembled, and next time DH has a few minutes I’ll get the rest. And given that the screws go into end grain wood, it’s a one-way trip. The cross bars with the pegs do come off and the two pieces and the central rod come off the base, but that’s the extent of disassembly.

I haven’t decided if I want to sell the warping board, it does break down and there is something nice about having it to cart to demos or lend to students. This is what the storage unit is for.

I’m working on some tablecloths, so I’m doing a lot of hemming. I have a 5mm narrow hem foot I use for this sort of thing, although I’m actually not very good at it. I can do an ok hem as long as the edge is perfectly straight and on-grain and I fold the edge ahead of the stitching and keep it under tension the whole time. Which you aren’t supposed to have to do.

Once in a while I try to practice the right way, but then I have something I need to get done. I found this tutorial from Threads I’m hoping will help.

Mastering the Narrow Hemmer Part One, Part Two, Part Three

Creative Commons License

© 2004-2007 Andrea Longo
spinnyspinny at feorlen dot org